This page looks best with JavaScript enabled

数据结构课设——赫夫曼编码译码器

 ·  ☕ 9 min read · 👀... views

大家都太强太卷了,人均可视化套接字,逼的本菜鸡被迫也要来卷一下。 为了不落俗套又要为紧张的期末(睡觉)省时间,这次整了个双语言+QT+Socket
赫夫曼编码译码器

以下提供核心代码和调试细节

任务书

题目

赫夫曼编码译码器

内容简介

利用赫夫曼编码进行通信可以大大提高信道利用率,缩短信息传输时间,降低传输成本。这要求在发送端通过一个编码系统对待传输数据预先编码,在接收端将传来的数据进行译码(复原)。对于双工信道(即可以双向传输信息的信道),每端都需要一个完整的编/译码系统。试为这样的信息收发站编写一个赫夫曼码的编/译码系统。

考核标准

一个完整的系统应具有以下功能:
(1) I:初始化(Initialization)。从终端读入字符集大小n,以及n个字符和n个权值,建立赫夫曼树,并将它存于文件hfmTree中。
(2) E:编码(Encoding)。利用已建好的赫夫曼树(如不在内存,则从文件hfmTree中读入),对文件ToBeTran中的正文进行编码,然后将结果存入文件CodeFile中。
(3) D:译码(Decoding)。利用已建好的赫夫曼树将文件CodeFile中的代码进行译码,结果存入文件Textfile中。

以下为选做:
(4) P:打印代码文件(Print)。将文件CodeFile以紧凑格式显示在终端上,每行50个代码。同时将此字符形式的编码文件写入文件CodePrin中。
(5) T:打印赫夫曼树(Tree printing)。将已在内存中的赫夫曼树以直观的方式(比如树)显示在终端上,同时将此字符形式的赫夫曼树写入文件TreePrint 中。

概要设计

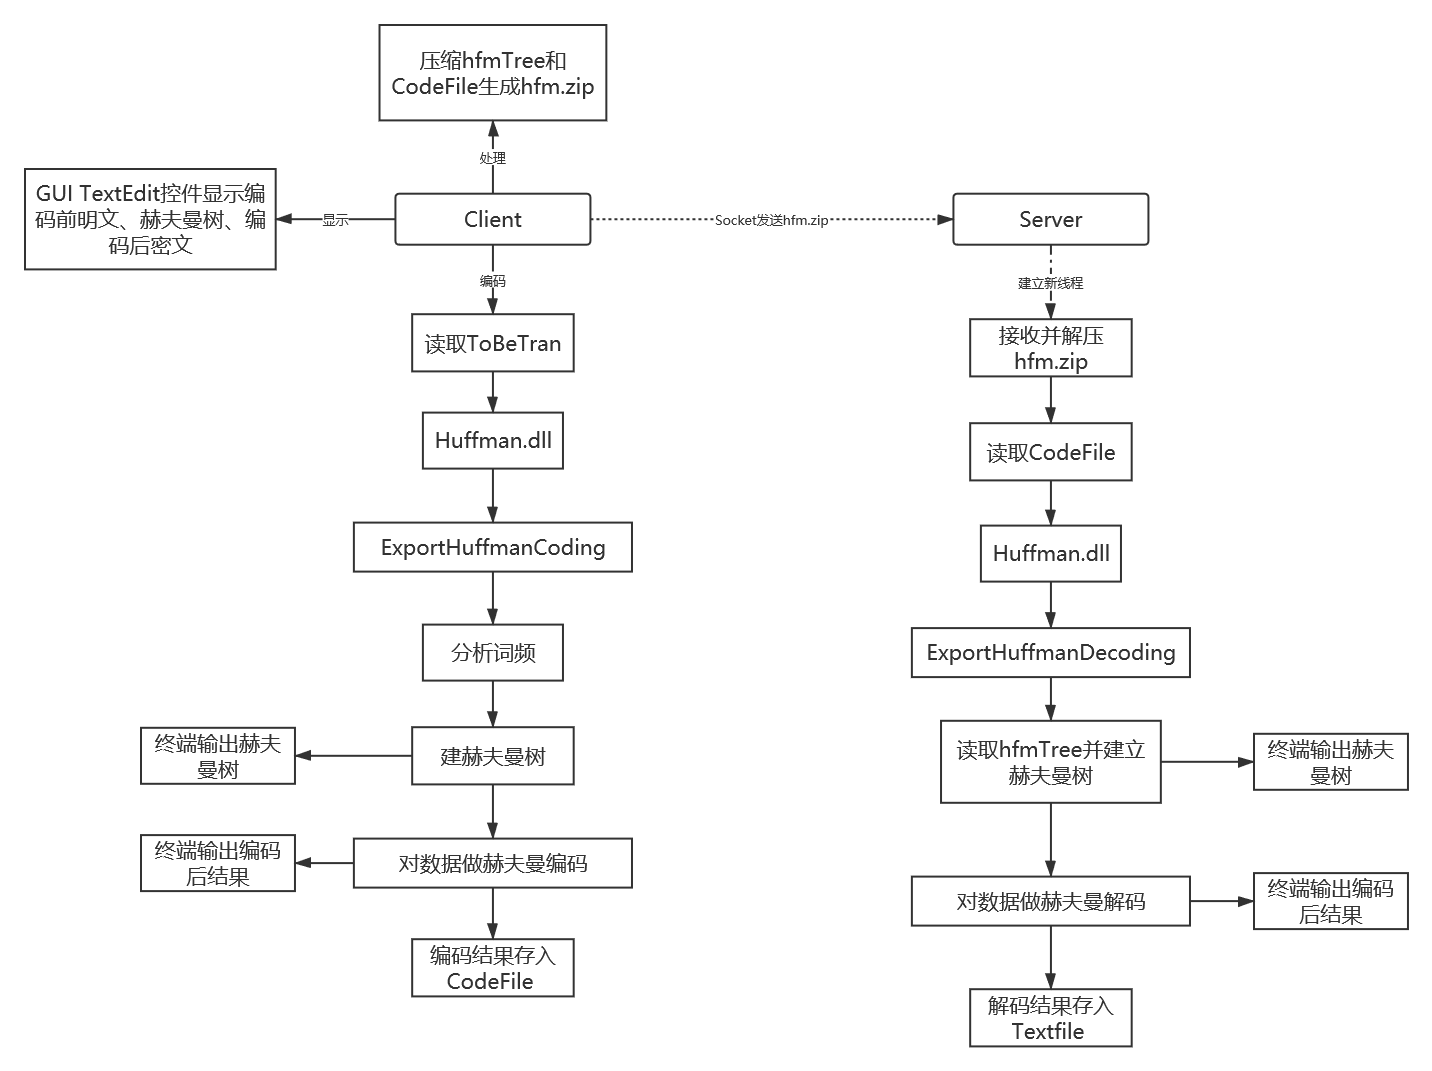
程序使用了C/C++, Python两种语言共同完成项目。赫夫曼建树、编码、解码与相关文件生成等算法相关功能实现通过C/C++设计后封装在动态链接库(DLL)种并导出了相关接口函数 ExportHuffmanCoding 和 ExportHuffmanDecoding GUI界面与基于Socket和多线程的C/S结构通过Python语言实现。GUI界面通过PyQt库完成设计,客户端与服务端间的数据传输通过ZipFile与Socket完成,并在服务端使用了多线程保证了一定程度的并发性。Python与动态链接库的对接使用了win32api和ctypes库使Python以C的方式加载了我们导出的算法模块库并以C的方式对其做了调用。

这样的C/C++、Python混合编程实现的设计结构使得项目在具有算法高性能与较高防逆向的安全性的同时兼具了Python的高拓展与高实用性。使之相较于一般的程序有更强的处理能力与可拓展空间。

核心代码

Huffman.hpp

这个头文件定义实现赫夫曼编码译码的所有逻辑算法函数,并被dllmain.cpp引用编译生成Huffman.dll动态链接库

  1
  2
  3
  4
  5
  6
  7
  8
  9
 10
 11
 12
 13
 14
 15
 16
 17
 18
 19
 20
 21
 22
 23
 24
 25
 26
 27
 28
 29
 30
 31
 32
 33
 34
 35
 36
 37
 38
 39
 40
 41
 42
 43
 44
 45
 46
 47
 48
 49
 50
 51
 52
 53
 54
 55
 56
 57
 58
 59
 60
 61
 62
 63
 64
 65
 66
 67
 68
 69
 70
 71
 72
 73
 74
 75
 76
 77
 78
 79
 80
 81
 82
 83
 84
 85
 86
 87
 88
 89
 90
 91
 92
 93
 94
 95
 96
 97
 98
 99
100
101
102
103
104
105
106
107
108
109
110
111
112
113
114
115
116
117
118
119
120
121
122
123
124
125
126
127
128
129
130
131
132
133
134
135
136
137
138
139
140
141
142
143
144
145
146
147
148
149
150
151
152
153
154
155
156
157
158
159
160
161
162
163
164
165
166
167
168
169
170
171
172
173
174
175
176
177
178
179
180
181
182
typedef struct _HTNode {
	BOOL jl; 
	DWORD weight;
	DWORD parent, lchild, rchild;
}HTNode, *HuffmanTree;
typedef char** HuffmanCode;

void StoreTree(HuffmanTree HT, int end) {
	fstream logger("hfmTree", ios::out);
	cout << "hrmTree:" << endl;
	cout << "Node\tWeight\tParent\tLchild\tRchild" << endl;
	HuffmanTree p = HT + 1;
	for (int i = 1; i <= end; ++i, ++p) {
		logger << i << " " << p->weight << " " << p->parent << " " << p->lchild << " " << p->rchild << endl;
		cout << i << " " << p->weight << " " << p->parent << " " << p->lchild << " " << p->rchild << endl;
	}

	logger.close();

}

void ReadTree(HuffmanTree& HT, int sum) {       // sum 为总节点数
	HT = (HuffmanTree)malloc((sum + 1) * sizeof(HTNode));

	//初始化
	HuffmanTree p = HT+1;
	int weight, parent, lchild, rchild;
	ifstream infile("hfmTree", ios::in);
	for (int i = 1; i <= sum; ++i, ++p) {
		infile >> i >> weight >> parent >> lchild >> rchild;
		cout << i << " " << weight << " " << parent << " " << lchild << " " << rchild << endl;
		p->jl = FALSE;
		p->weight = weight;
		p->parent = parent;
		p->lchild = lchild;
		p->rchild = rchild;
	}


}


void Select(HuffmanTree HT, int top, int& s1, int& s2) {
	int s1_val = MAXVALUE, s2_val = MAXVALUE;
	int i = 1;
	for (HuffmanTree p = HT+1; i <= top; ++i, ++p) {
		if (p->jl == TRUE)	continue;
		if (p->weight < s1_val) {
			if (s1_val != MAXVALUE)	HT[s1].jl = FALSE;   // 把之前的选择取消
			s1_val = p->weight;
			s1 = i;
			HT[s1].jl = TRUE;
		}
		else if (p->weight < s2_val) {
			if (s2_val != MAXVALUE)	HT[s2].jl = FALSE;   // 把之前的选择取消
			s2_val = p->weight;
			s2 = i;
			HT[s2].jl = TRUE;
		}
	}
	// cout << "s1: " << s1 << '\t' << "s2: " << s2 << endl;

}

void CreateTree(HuffmanTree& HT, int* w, int n) {
	if (n <= 1)	return;
	int sum = 2 * n - 1;   // 总节点数

	HT = (HuffmanTree)malloc((sum + 1) * sizeof(HTNode));

	//初始化
	HuffmanTree p = HT; 
	for (int i = 1; i <= n; ++i, ++w, ++p)	*p = { FALSE, (DWORD)*w, 0, 0, 0 };  // 对叶子节点初始化
	for (int i = n+1; i <= sum; ++i, ++p)	*p = { FALSE, 0, 0, 0, 0 };


	// 建树
	for (int i = n + 1; i <= sum; ++i) {
		int s1, s2;
		Select(HT, i - 1, s1, s2);
		HT[s1].parent = i;  HT[s2].parent = i;
		HT[i].lchild = s1; HT[i].rchild = s2;
		HT[i].weight = HT[s1].weight + HT[s2].weight;
	}
	HT[sum].parent = 0;

	StoreTree(HT, sum);     // 保存赫夫曼树至文件hfmTree
}

void HuffmanCoding(HuffmanTree& HT, HuffmanCode& HC, int n) {
	if (n <= 1 || HT == nullptr)	return;
	int m = 2 * n - 1;   // 总节点数

	// 编码
	HC = (HuffmanCode)malloc((n + 1) * sizeof(char*));
	int cdlen = 0;
	int i = m; 
	for (int k = 0; k <= m; ++k)	HT[k].weight = 0;  // 将weight字段作为状态标志
	while (i) {
		// printf("i:%d\n", i);
		if (HT[i].weight == 0) {   // 向左
			HT[i].weight = 1;
			if (HT[i].lchild != 0) { i = HT[i].lchild; cd[cdlen++] = '0'; }
			else if (HT[i].rchild == 0) {       //  登记叶子节点的字符编码
				HC[i] = (char*)malloc((cdlen + 1) * sizeof(char));
				cd[cdlen] = '\x00';    // 截断
				strcpy(HC[i], cd);
			}
		}
		else if (HT[i].weight == 1) {   // 向右
			HT[i].weight = 2;
			if (HT[i].rchild != 0) { i = HT[i].rchild; cd[cdlen++] = '1'; }
		}
		else {
			HT[i].weight = 0;
			i = HT[i].parent;
			cdlen--;     // 回退到父节点
		}
	}
}

void HuffmanDecoding(HuffmanTree& HT, char * cipher, char ** result, int cnt) {
	if (cnt <= 0 || HT == nullptr)	return;
	*result = (char*)malloc((cnt + 1) * sizeof(char*));
	int i = 0, p = 255, res_p = 0;
	while (cipher[i] != '\x00') {
		if (cipher[i] == '0')       // 向左
			p = HT[p].lchild;
		else if (cipher[i] == '1')   // 向右
			p = HT[p].rchild;
		else if (cipher[i] == ' ') {   //记录
			(*result)[res_p++] = p;
			p = 255;           // 重新置为根节点
		}
		i++;
	}
	(*result)[res_p++] = p;    // 处理最后一个字符
	
}


void ExportHuffmanCoding(char * code) {
	HuffmanTree HT = nullptr;
	HuffmanCode HC = nullptr;

	int weight[128] = { 0 };


	for (int i = 0; i < strlen(code); ++i)
		weight[code[i]]++;
	CreateTree(HT, weight, 128);
	
	HuffmanCoding(HT, HC, 128);

	//for (int i = 0; i < strlen(code); ++i)
	//    printf("%c : %s\n", code[i], HC[code[i]]);
	 fstream logger("CodeFile", ios::out);
	 cout << "Encode Result:" << endl;
	 for (int i = 0; i < strlen(code); ++i) {
	    cout << HC[code[i]] << " ";
	    logger << HC[code[i]] << " ";
	 }
	 cout << endl;
	 logger.close();

}

void ExportHuffmanDecoding(char * cipher, char ** result, int length) {

	HuffmanTree HT = nullptr;
	ReadTree(HT, 2 * 128 - 1);

	// Decoding
	fstream logger("Textfile", ios::out);
	HuffmanDecoding(HT, cipher, result, length);
	(*result)[length] = '\x00';
	cout << "Decode Result: " << *result << endl;
	logger << *result << endl;
	logger.close();
	//printf("result:%p\n", *result);
}

这里的代码应该都非常好理解,就是很朴实的赫夫曼编码译码的逻辑函数,但是将它编译成dll一定要有几个注意点。

  1. 要用release编译。因为DLL是被加载到Python虚拟机中的,并不会像直接加载到PE文件的进程中操作系统会直接为其自动加载其所需的依赖模块并拓展IAT,如果用Debug编译因为有大量的其他库依赖,运行时会因为没有加载依赖库而报错
  2. 要导出接口函数 如果不导出接口函数,加载该动态库后也是用不了里面的函数的(加载动态库后只能从外部调用DLL导出的函数,别的函数均不可见)
  3. 要编译成对应架构的。即DLL的架构位数要与你电脑Python环境的架构位数相同。比如你电脑Python环境是x64的,但是DLL却编译成了x86的,在加载该动态库时就会报“不是有效的Win32应用程序错误”
  4. 关闭编译器优化 我最早开了编译器优化怎么跑怎么错,最后调试跟到DLL里去发现逻辑竟然被优化错了,就很玄学,点到为止懂得都懂(

server.py

服务端,用于实现接受客户端发送来的赫夫曼树和赫夫曼编码后结果,并将其译码并输出保存

 1
 2
 3
 4
 5
 6
 7
 8
 9
10
11
12
13
14
15
16
17
18
19
20
21
22
23
24
25
26
27
28
29
30
31
32
33
34
35
36
37
38
39
40
41
42
43
44
45
46
47
48
49
50
51
52
53
54
55
56
57
58
59
60
61
62
63
64
65
66
67
68
ntdll = WinDLL("ntdll.dll")
kernel32 = ctypes.windll.LoadLibrary("kernel32.dll")
HuffmanDll = ctypes.WinDLL("./Huffman.dll")
GetLastError = kernel32.GetLastError
ExportHuffmanCoding = HuffmanDll.ExportHuffmanCoding
ExportHuffmanCoding.argtypes = [c_char_p]
ExportHuffmanDecoding = HuffmanDll.ExportHuffmanDecoding
ExportHuffmanDecoding.argtypes = [c_char_p, c_char_p, c_int]

def unziphfm():
    # 解压
    z = zipfile.ZipFile('hfm.zip', 'r')
    z.extractall()

def hfmdecode():
    unziphfm()      # 解压文件

    with open("CodeFile", 'rb') as fp:
        cipher = fp.read()
    print("cipher:", cipher.decode())
    length = len(cipher.decode().split())

    result_addr = c_char_p(b'')
    ciper = create_string_buffer(cipher)
    ExportHuffmanDecoding(ciper, result_addr, length)
    result_addr = int.from_bytes(result_addr.value, byteorder='little')
    result = ctypes.cast(result_addr, c_char_p).value    # 得到的是result的指针  要再解一次引用
    # print(result)

def tcplink(skt,addr):
    print(skt)
    print(addr,"已经连接上...")
    print('开始接受hfm.zip文件')
    with open('hfm.zip', 'wb') as f:
        while True:
            data = skt.recv(1024)
            if not data:    break
            f.write(data)
    print("hfm.zip接收完毕, 开始解码")
    skt.close()

    hfmdecode()


HOST = "127.0.0.1"
PORT = 23333
ADDR = (HOST,PORT)
 
server = socket(AF_INET,SOCK_STREAM)
server.bind(ADDR)
server.listen(5)
 
while True:
    print("等待连接...")
    skt,addr = server.accept()
    print(skt)
    try:
        # 建立新线程接收数据
        t = threading.Thread(target=tcplink, args=(skt,addr,))   
        t.start()
        t.join()
    except Exception as e:
        print("线程无法启动")
        print(e)


server.close()

这里技巧性就比较高了,首先要先导出C语言的类型。至于为什么要导出类型呢,因为Python是解释型语言,其代码是不会被编译成机器码生成可执行文件的,运行时是将Python代码编译成Python字节码送入Python虚拟机中运行的。这样可以更好的实现高级语言的特性,让一切均为类,但是也会带来Python类型与底层数据类型(C语言数据类型不兼容的结果)。 降维一下举个栗子,Python里数字其实也是Python的一个类对象,是由内置类型整数类实例出来的一个对象,而C语言中的数字就是最原始的数值。而当我要传参一个数字给我写的动态链接库中的函数时,我给他传一个Python里的数字对象显然是行不通的。我们需要一些手段直接定义C语言里最原始的那些数据类型,用作参数传递和范围值接受。 这里用到的是ctypes库导出类型并加载动态链接库

然后这里还有一个问题就是解引用。 ExportHuffmanDecoding 函数的第二个参数用于保存译码后的结果,它是一个二级指针,并且其指向的空间是在DLL中被动态分配的。那么问题来了,我用Python代码给这个参数传了一个char指针,然后调用value方法,Python会对这个char指针做一次解引用并尝试获取该地址处的字符串的值。 但是,这个参数是一个二级指针,这就意味着我们获取到该指针处的值后(此时.value方法已经对其做了一次解引用),我们还要对这个值做小端序转化,将它从原来的char类型转换成一个数值(地址),然后再对这个地址做一次解引用,才能得到真正的译码结果。 这里我查了好多资料,最后采用了int.from_bytes + ctypes.cast方法做类型转换和解引用,取到了真正的值

client.py

这个python文件用于客户端的赫夫曼编码、赫夫曼树与编码后文件打包、压缩包文件发送至服务端的功能。调用实现和server差不多

 1
 2
 3
 4
 5
 6
 7
 8
 9
10
11
12
13
14
15
16
17
18
19
20
21
22
23
24
25
26
27
28
29
30
31
32
33
34
35
36
37
38
39
40
def ziphfm( ):
    # 压缩
    z = zipfile.ZipFile('./hfm.zip', 'w', zipfile.ZIP_DEFLATED)
    z.write('hfmTree')
    z.write('CodeFile')
    z.close()

def send():

    HOST = "127.0.0.1"
    PORT = 23333
    ADDR = (HOST,PORT)
    
    client = socket(AF_INET,SOCK_STREAM)
    client.connect(ADDR)
    
    with open("./hfm.zip","rb") as fp:
        for data in fp:
            # print(data)
            client.send(data)
    client.close()
    
    print("发送完毕")
    client.close()

def main():
    with open("./ToBeTran", 'rb') as fp:
        context = fp.read()
    print("Text:", context.decode())

    a = c_char_p(context)
    ExportHuffmanCoding(a)

    ziphfm()
    try:
        send()
    except ConnectionRefusedError as e:
        print("无法连接服务端")
        return False
    return True

client_main.py

用于实现GUI界面

 1
 2
 3
 4
 5
 6
 7
 8
 9
10
11
12
13
14
15
16
17
18
19
20
21
22
23
24
25
26
27
28
29
30
31
32
33
34
35
36
37
38
39
40
41
42
43
44
45
46
47
48
49
50
51
52
53
import sys, client
import threading, HuffmanClient
from PyQt5.QtCore import QFile
from PyQt5.QtWidgets import QFileDialog, QMessageBox, QApplication, QMainWindow
from PyQt5.QtGui import QImage, QPixmap

class Display:
    def __init__(self, ui, mainWnd):
        self.ui = ui
        self.mainWnd = mainWnd

        ui.pushButton.clicked.connect(self.start)


        # 创建一个关闭事件并设为未触发
        self.stopEvent = threading.Event()
        self.stopEvent.clear()


    def start(self):
        if client.main() == False:
            self.ui.textEdit.setPlainText("无法连接服务端")
            return False

        viewText = "Text: "
        with open("ToBeTran", 'r') as fp:
            viewText += fp.read() + '\n\n'
        viewText += "hfmTree:\n"
        viewText += "Node Weight Parent Lchild Rchild\n"
        with open("hfmTree", 'r') as fp:
            viewText += fp.read() + '\n\n'
        viewText += "Encode Result:\n"
        with open("CodeFile", 'r') as fp:
            viewText += fp.read() + '\n'
        self.ui.textEdit.setPlainText(viewText)


if __name__ == '__main__':
    app = QApplication(sys.argv)
    mainWnd = QMainWindow()
    ui = HuffmanClient.Ui_MainWindow()

    # 可以理解成将创建的 ui 绑定到新建的 mainWnd 上
    ui.setupUi(mainWnd)

    display = Display(ui, mainWnd)

    mainWnd.show()

    sys.exit(app.exec_())

这里GUI界面直接用Qtdesigner画的,超级简陋,就一个Button和TextEdit(实在是不想卷了)

其实到这一步,可以实现的东西已经很多了,毕竟已经从C++拓展到Python了。可以直接调matplotlib库画出很好看的赫夫曼树图,也可以把GUI界面画的花里胡哨,甚至可以用flask、Django这些起个Web服务出来。不过这些内容就不是本文所能涵盖的了

Share on

Qfrost
WRITTEN BY
Qfrost
CTFer, Anti-Cheater, LLVM Committer